View Original Article

A business venture of mine has been evolving and as a result, I’m excited to get my first in-depth, real-world exposure to the WP REST API. For the most part, I know my way around as I took a day or two back when it was all the talk to learn the basics but I’ve never had a good real-world opportunity come up to use it until recently.
Without getting to in-depth on the specific project, the main goal is to securely create a post (as a custom post type) and also create a new user. We’ll also be updating custom fields for both the post and the user. These custom fields will have already been created using Advanced Custom Fields.
Setting The Stage:
For this tutorial, I’m going to assume that Site A & Site B are both WordPress sites. Site A is where I will want to connect to the REST API. Site B will be where the remote call will be coming from.
On Site A, I’m going to install a plugin from the WordPress repository called Application Passwords. It will handle our authentication. Application Passwords is a step above basic username/password authentication but below Oauth. It will work for this project since there will only be one, consistent source that will be sending requests to the API. Application Passwords is also very simple to setup and work with.

On Site B, I’m going to install my handy WP Cover ‘Do Random Stuff’ Plugin. You don’t have to if you prefer to setup the test environment a different way but this plugin just creates a simple canvas to construct my API calls to Site A.
Gathering Credentials
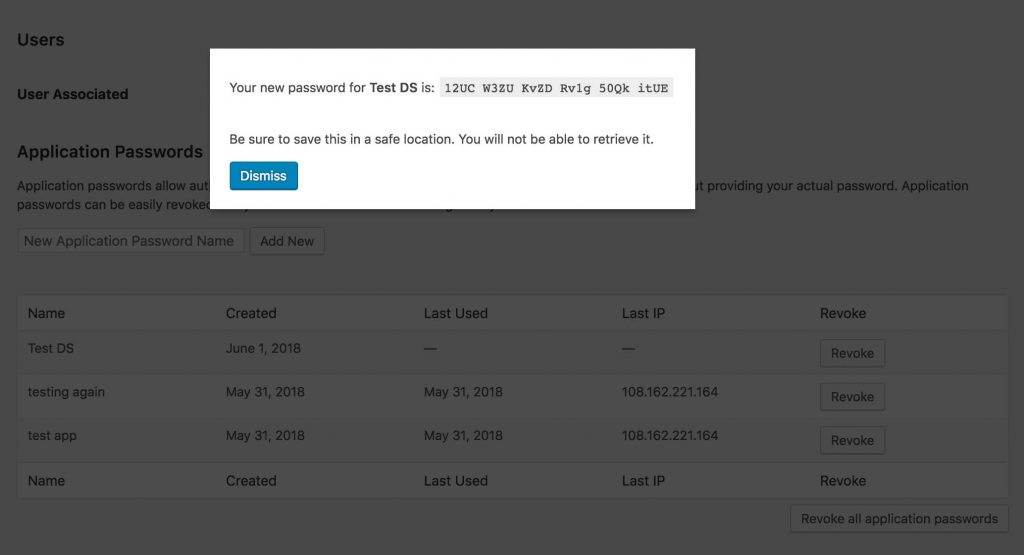
Next, it’s time to gather my authorization credentials. Head over to Site A and activate the Application Passwords plugin if you did not do so already. Head over to Users and edit or create a new Editor user.
Side note, for my specific project I did not want to give full admin capabilities to the user connecting over the API. This is why I’ve utilized an Editor. For your project, you may be fine with using an Admin role instead. Up to you.
On the Edit User screen for the user you have selected, scroll to the bottom and generate a new Application Password. A popup will show your application password. Make sure you save it as it will never be shown again.
Constructing the Call
We’re ready to head over to site B and construct our API call. We’ll go edit our ‘Do Random Stuff” plugin with the below code (I’ll explain it in a minute):
Do Stuff
Click Process button to do whatever is below in your run process. array( 'Authorization' => 'Basic ' . base64_encode( 'USERNAME:APPLICATION_PASSWORD' ) ), 'body' => array( 'title' => 'WP Cover Test Post', 'status' => 'draft', 'content' => 'this is the main content box', 'meta' => array('field-symbol' => 'CNENT', 'field-description' => 'I get it') ) ) ); $body = json_decode( $api_response['body'] ); if( wp_remote_retrieve_response_message( $api_response ) === 'Created' ) { echo 'The post ' . $body->title->rendered . ' has been created successfully'; } } ?>The first value you will want to change will be the wp_remote_post URL. Obviously replace YOURWEBSITE with the correct URL to Site A. Also, the very last value of /dogs should correctly correspond to your custom post type. Secondly, you’ll need to adjust the USERNAME and APPLICATION_PASSWORD to the WordPress username and application password you generated in the earlier step.
Your API call is almost ready to go! Go ahead and adjust the post data inputs as you see the need until we get to the last value of Meta. Meta will be your custom fields and as I mentioned earlier, I’ve already created these custom fields on Site A using Advanced Custom Fields. The meta values are delivered in an array as seen in the above code example.
Before our meta values will successfully populate into the post, we have to add another function. Head back over to Site A and open up the functions.php file on your active theme and add in the following:
add_action("rest_insert_dogs", function (WP_Post $post, $request, $creating) { $metas = $request->get_param("meta"); if (is_array($metas)) { foreach ($metas as $name => $value) { update_post_meta($post->ID, $name, $value); } } }, 10, 3);On the first line, change the action of rest_insert_dogs to your custom post type. So if your post type was cats, your action would be rest_insert_cats.
Save the file.
Ready to Go
You’re ready to test out your API call. Press the Process Posts button the Do Random Stuff plugin page on Site B and see what happens! If all went to plan, you should be returned a value of:
The post (Insert Post Name) has been created successfully.
Of course you’ll want to check on Site A to be sure everything went smoothly.
I’ll be back next week to discuss the API call to add a new user and we’ll also combine both of these calls to effectively add a new post created by this new author.
The post WordPress REST API – Creating A Post With Post Meta (Custom Fields) appeared first on WP Cover.